How To Guide to Migrating Google Cloud Projects between Organizations
In the past, migrating projects between accounts / organizations in Google Cloud was impossible and required assistance from their Enterprise Support team. Recently, Google made that process much simpler and it can be done without Google’s involvement, as long as you have proper access and permissions to both organizations, source and destination.
Migrating projects between organizations requires planning as it requires multiple steps which need to be coordinated between both GCP accounts / organizations. In this guide, we will explain a step-by-step process to migrate a project(s) from one Google Cloud Organization to another.
Preparation
In the effort of preparation for the project migration between different Organizations in Google Cloud, you will need to gather the following information.
In Google Cloud’s hierarchy, Projects are created under Organizations. You can also use a two-level hierarchy and assign Projects under Folders which are children of Organizations.
1. Project ID(s) of the project(s) you want to migrate
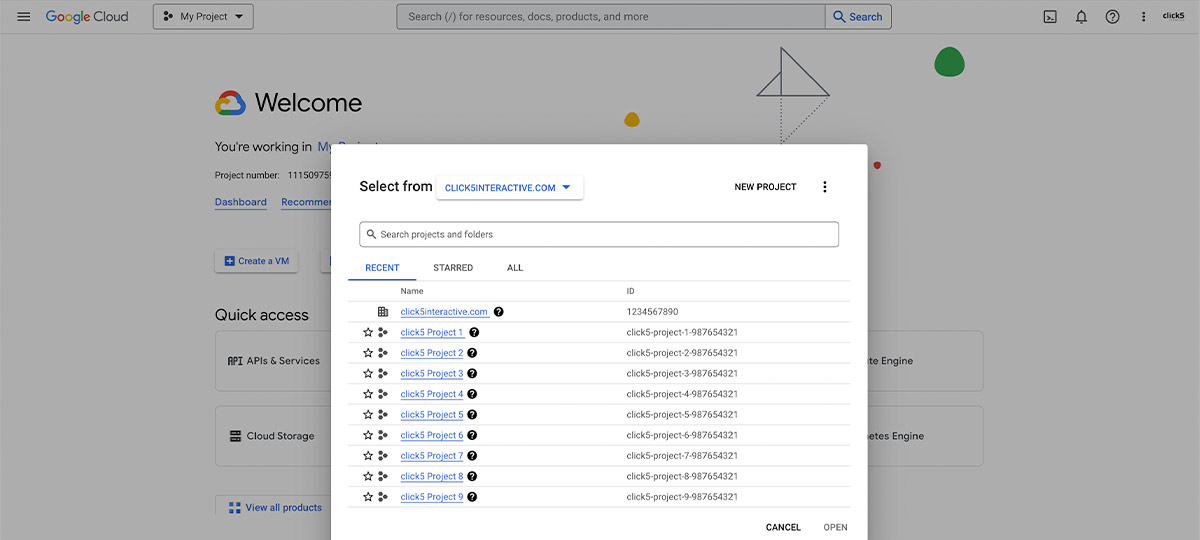
In order to locate ID(s) of the project(s) you want to migrate, navigate to the Welcome/Dashboard page of your Google Cloud Console account and click on the project selector in the top left corner, next to the Google Cloud logo. A modal window will open with a list of Organizations and Projects you have access to, with their respective Organization or Project IDs.
2. The source organization’s Organization ID
You can find your Organization ID following steps from the previous bullet point. Your Organization is listed along with your Projects, as seen on the screenshot above.
3. The destination organization’s Organization ID
You will have to ask the owner/administrator of the organization where you want to migrate your project(s) to, to send their Organization ID.
Assign user Permissions and configure organization Policies
As we gathered IDs of project(s) which we need to migrate, and IDs of the source and destination Organizations, you need to set up user permissions and policies as follows:
1. Assign permissions in the Source organization
You need a particular set of IAM permission roles to migrate project(s) between organizations in Google Cloud.
You can get the necessary permissions by acquiring the following roles:
- Project Mover (
roles/resourcemanager.projectMover) on the project you want to migrate or its parent resource. - Organization Policy Administrator (
roles/orgpolicy.policyAdmin) on the parent organization resource.
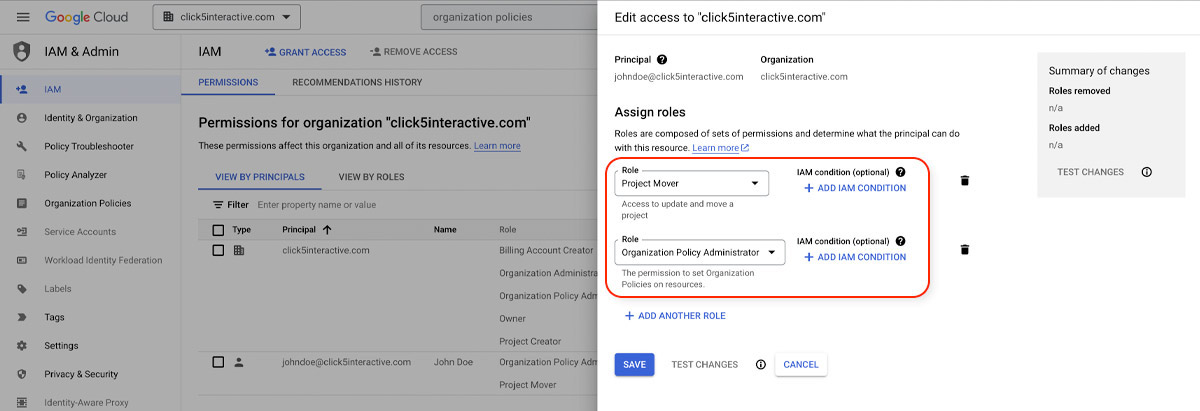
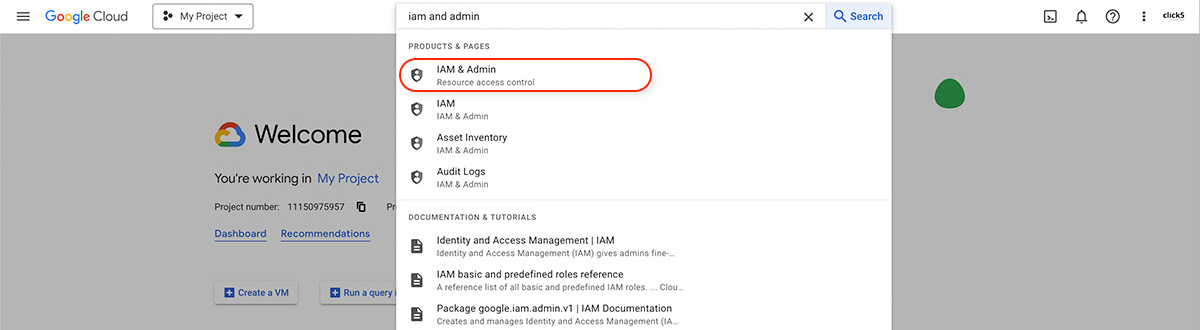
In order to assign the necessary permissions, search for ‘iam and admin’ in the source organization’s Google Cloud Console account. Then click on the page labeled ‘IAM & Admin‘.

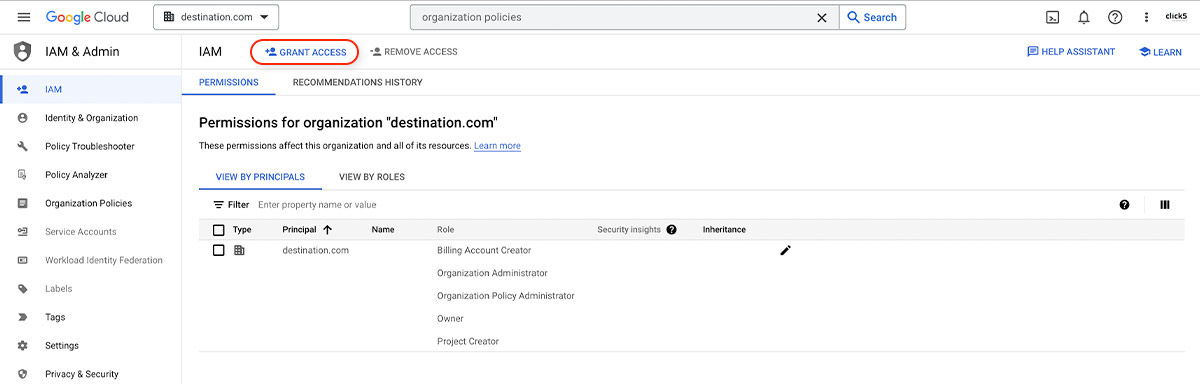
Click on the pencil icon next to the user you want to assign the permissions to, and select necessary roles, as seen on the screenshot below.
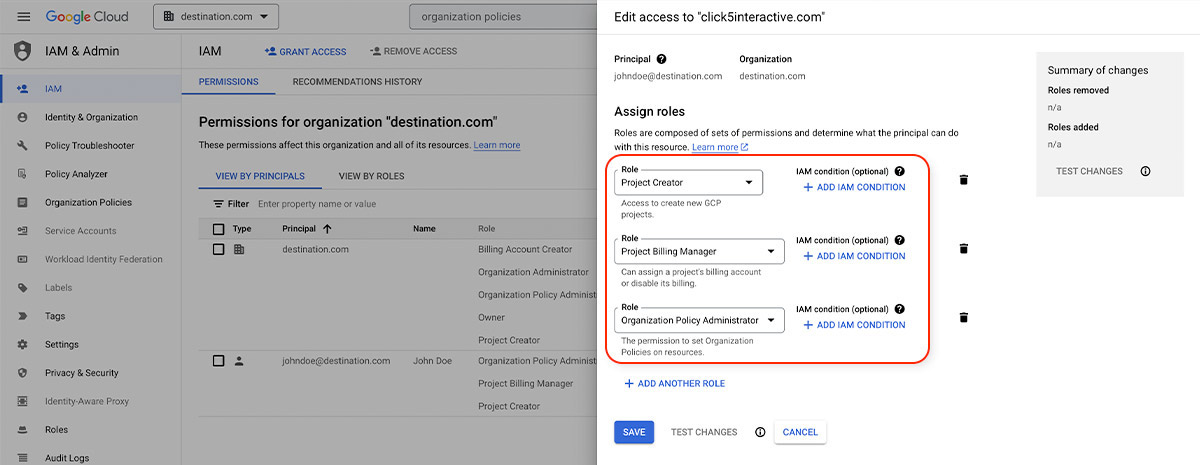
2. Assign permissions in the Destination organization
In the destination organization, you will need following permissions:
- Project Creator (
roles/resourcemanager.projectCreator) on the parent organization resource. - Project Billing Manager (
roles/billing.projectManager) on the project you’ve migrated or its parent resource. - Organization Policy Administrator (
roles/orgpolicy.policyAdmin) on the parent organization resource.
3. Configure organization Policies in the Source organization
To migrate a project to a new organization, you will also need specific set of permissions to create and manage organization policies.
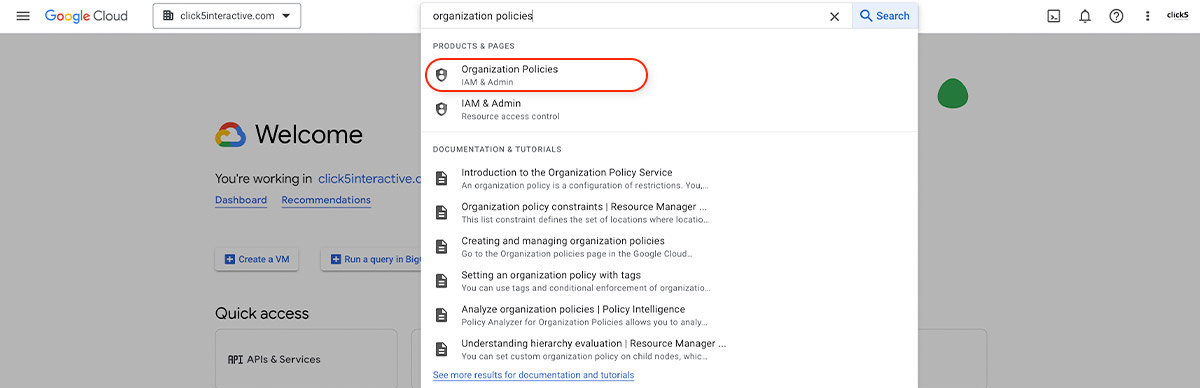
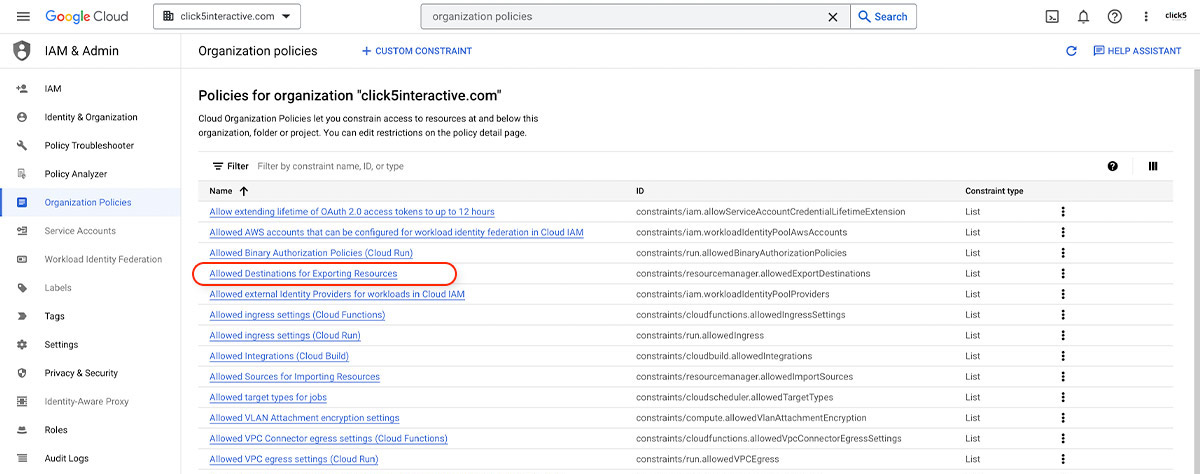
- Open the Welcome / Dashboard page of the source organization’s Google Cloud Console account and search for ‘organization policies’. Then click on the page labeled ‘Organization policies (IAM and admin)‘.
- On the Organization policies page, click on the ‘Allowed Destinations for Exporting Resources’ option.
- Click on the ‘MANAGE POLICY’ button next to the ‘Policy for Allowed Destinations for Exporting Resources’ heading.
Note: If you don’t see the ‘MANAGE POLICY’ button, it means you haven’t been assigned the ‘Organization Policy Administrator’ role in the source organization. Confirm if you have been assigned this role and try again.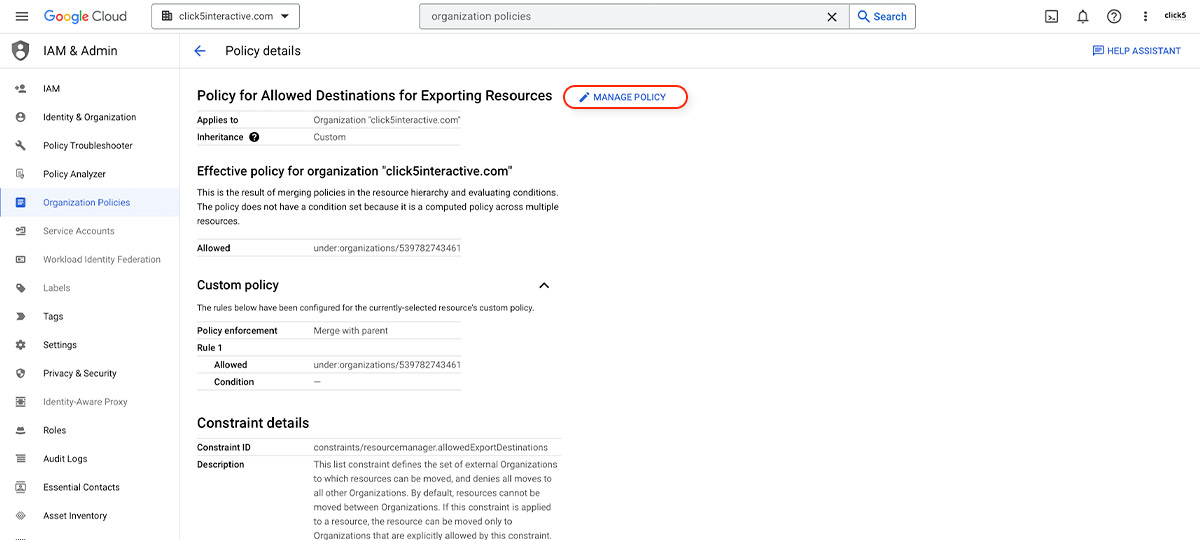
- Select the ‘Customize’ radio button, and the ‘Merge with parent’. Then click on ‘ADD A RULE’. For the Policy values select ‘Custom’, and for the Policy type select ‘Allow’. In the Custom values section enter ‘
under:organizations/DESTINATION_ORGANIZATION_ID’ and click ‘DONE’.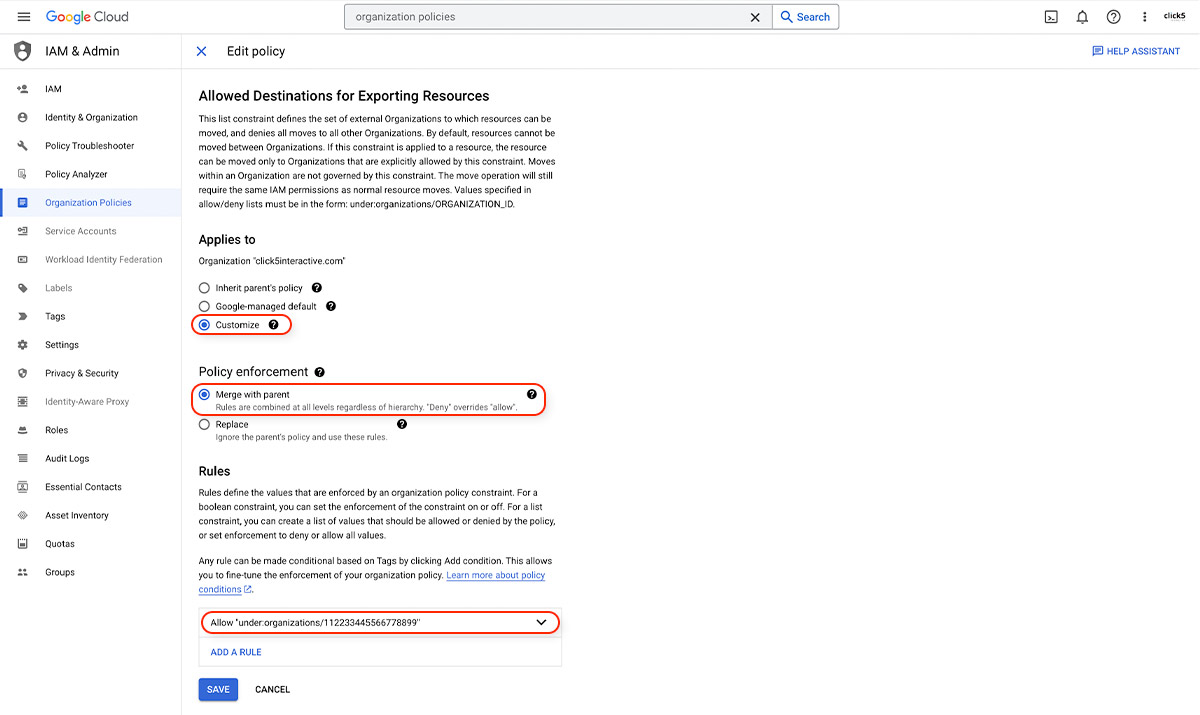
This will grant the permissions for your project to be exported to the destination organization.
4. Configure organization Policies in the Destination organization
In the destination organization, you will need following policies.
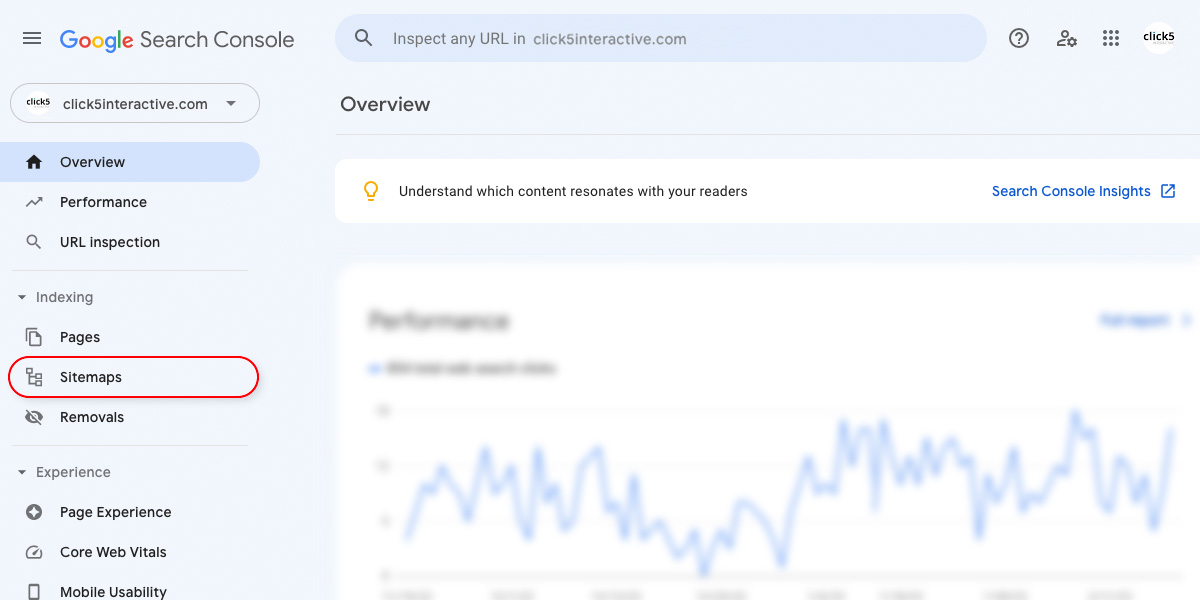
- Open the Welcome / Dashboard page of the destination organization’s Google Cloud Console account and search for ‘organization policies’. Then click on the page labeled ‘Organization policies (IAM and admin)‘.

- On the Organization policies page, click on the ‘Allowed Sources for Importing Resources’ option.
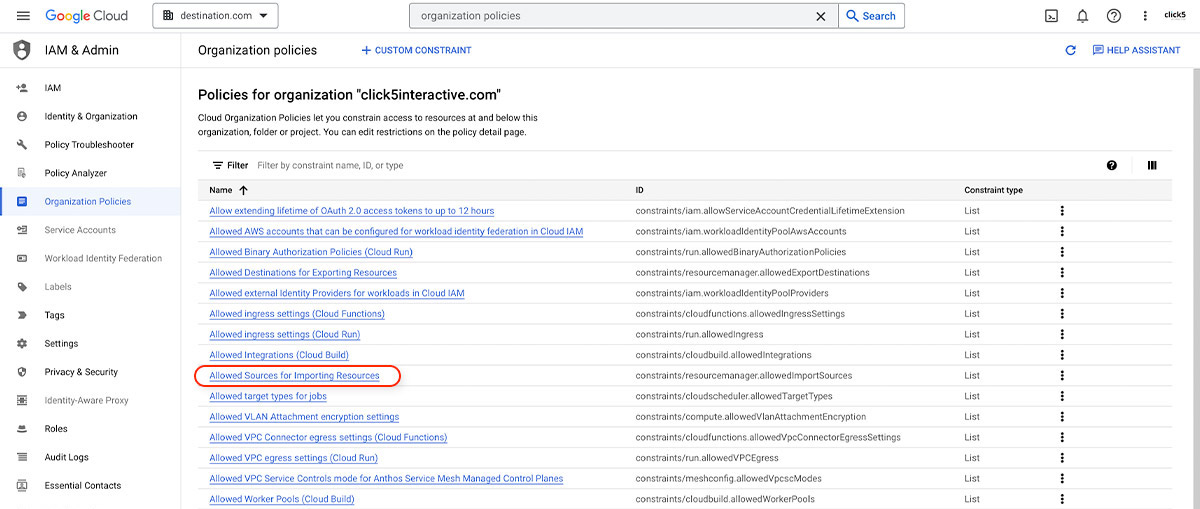
- Click on the ‘MANAGE POLICY’ button next to the ‘Policy for Allowed Sources for Importing Resources’ heading.
Note: If you don’t see the ‘MANAGE POLICY’ option, it means you haven’t been assigned the ‘Organization Policy Administrator’ role in the destination organization. Confirm if you have been assigned this role and try again.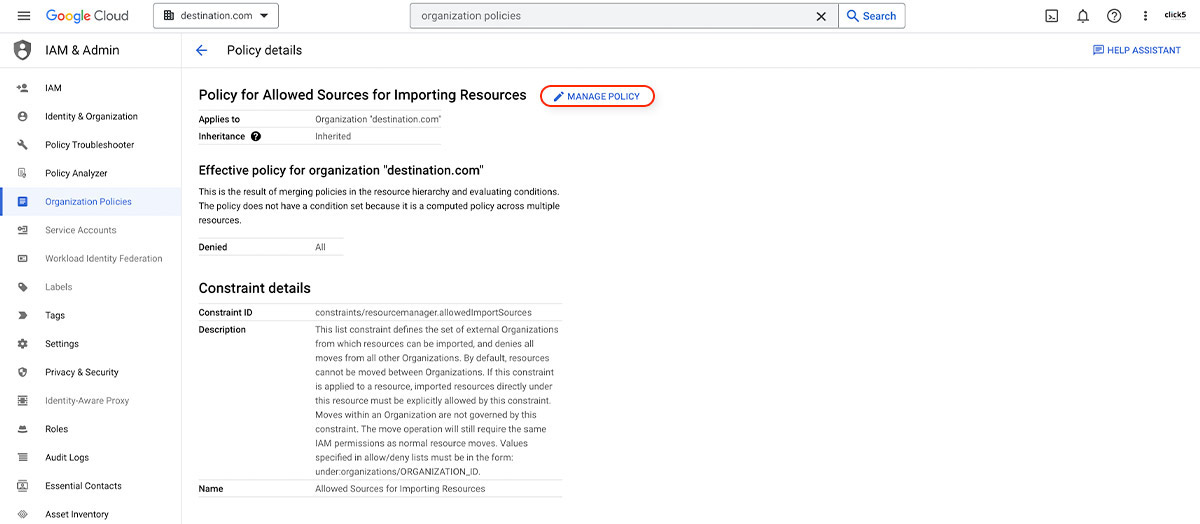
- Select the ‘Customize’ radio button, and the ‘Merge with parent’. Then click on ‘ADD A RULE’. For the Policy values select ‘Custom’, and for the Policy type select ‘Allow’. In the Custom values section enter ‘
under:organizations/SOURCE_ORGANIZATION_ID’ and click ‘DONE’.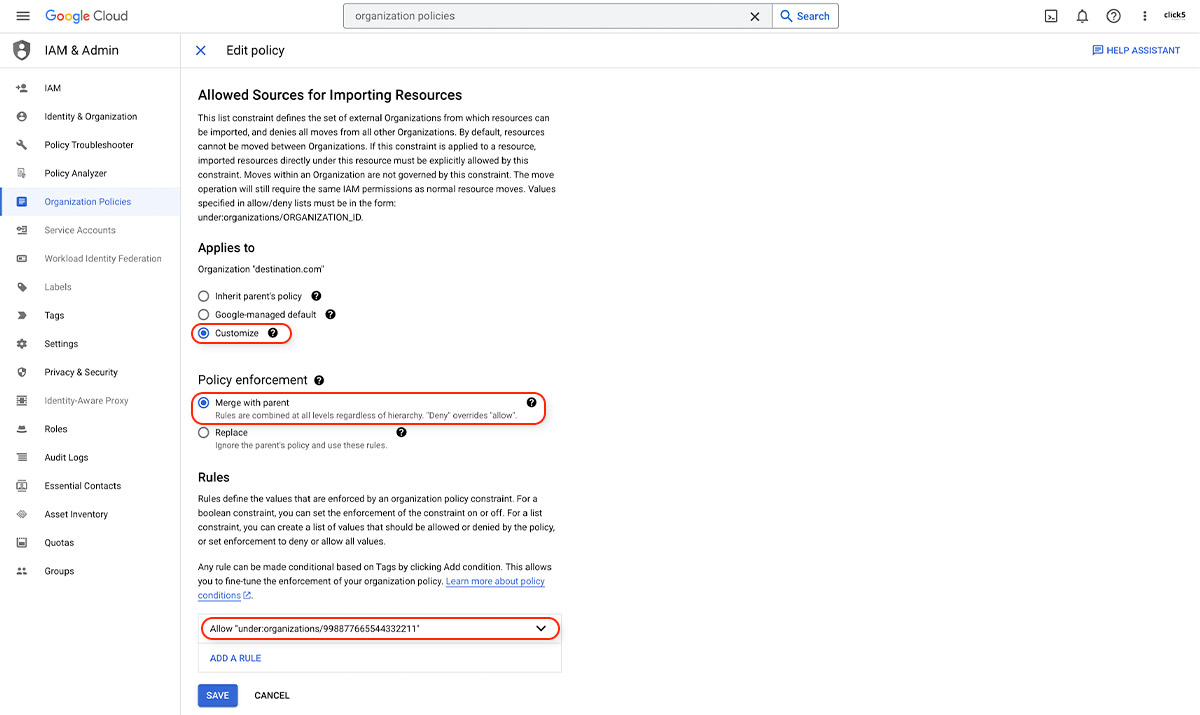
Change Billing Account for the migrated Project(s)
Google Cloud Billing accounts can be used across organization resources. Moving a project from one organization to another won’t impact billing, and charges will continue against the old billing account. However, if you have the proper permissions, you can migrate billing to a new account, by following these steps:
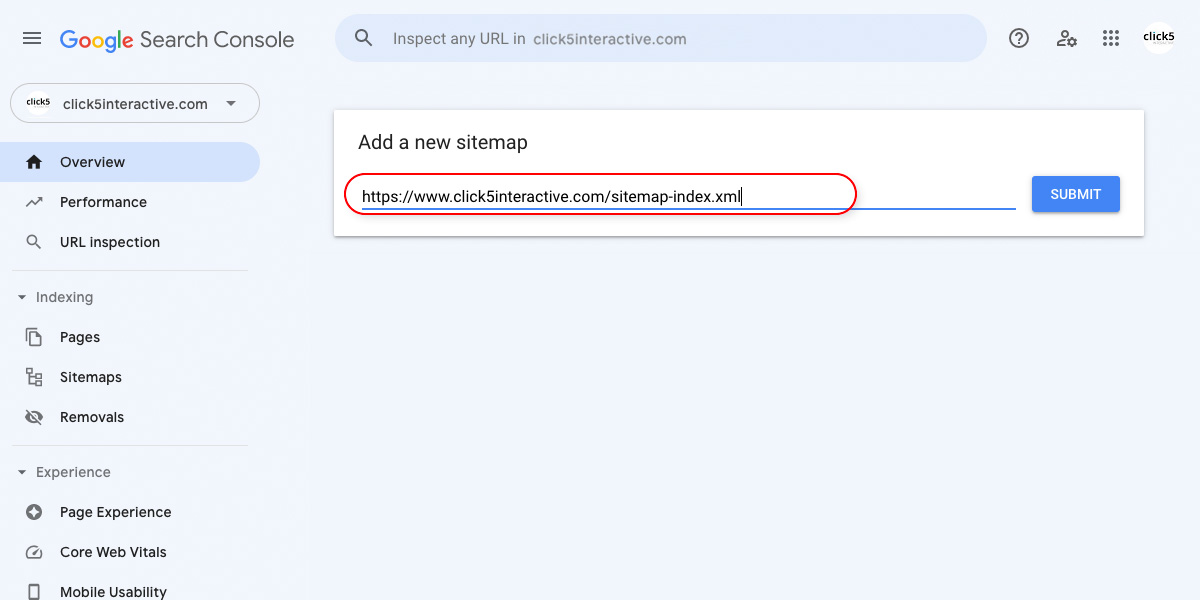
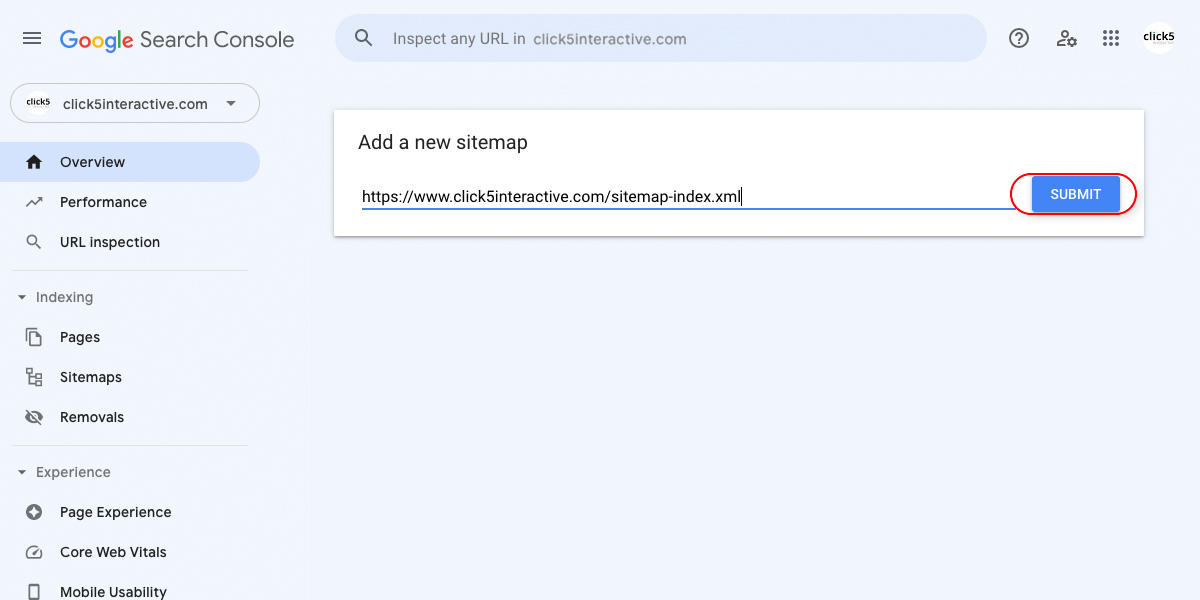
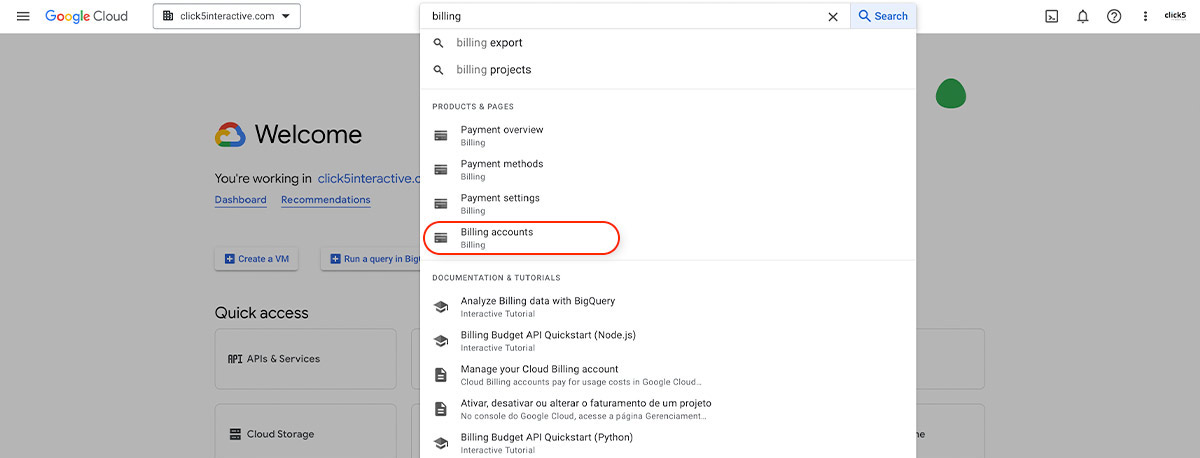
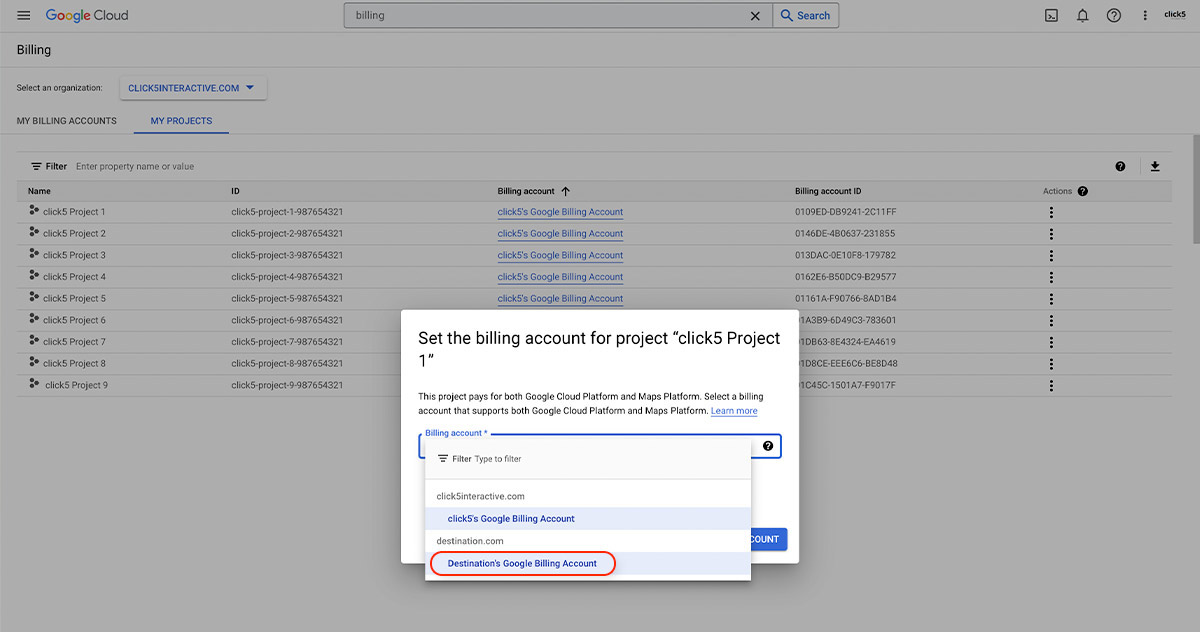
- Open the Welcome / Dashboard page of the source organization’s Google Cloud Console account and search for ‘billing’. Then click on the ‘Billing accounts‘ page.
- Switch to the ‘MY PROJECTS‘ tab of the Billing page. Then in the Actions menu for the relevant project, click on the ‘Change Billing‘ option.
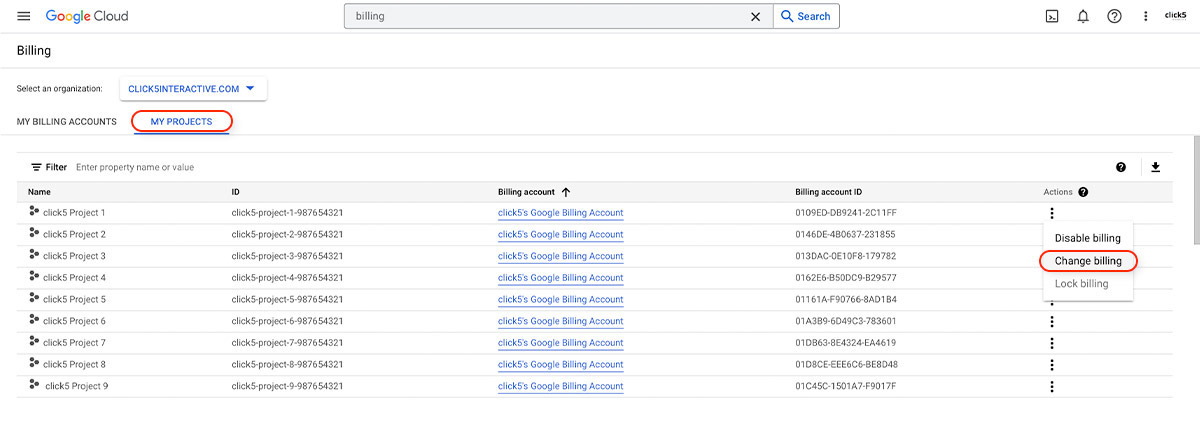
- In the modal window, select the billing account of the destination organization and click on ‘SET ACCOUNT‘ button.
Perform the migration with Cloud SDK
If you have the appropriate IAM permissions and the required organization policies are enforced in both organizations, you are ready to start migrating Google Cloud projects between organizations.
Here are instructions how to migrate project(s) from one organization to another.
- Install gcloud CLI (Google Cloud CLI) on your local computer.
- Log into gcloud CLI account using the Google Cloud user which has been granted all the required permissions for project migration.
- Run this command to migrate a project:
gcloud beta projects move PROJECT_ID --organization DESTINATION_ORGANIZATION_IDIf you would like to migrate a project to a folder under the destination organization, then use this command:
gcloud beta projects move PROJECT_ID --folder DESTINATION_FOLDER_IDReplace the following fields:
- PROJECT_ID is the ID of the project you wish to migrate.
- DESTINATION_ORGANIZATION_ID is the ID of the destination organization resource to which you want to move the project to.
- DESTINATION_FOLDER_ID is the ID of the folder under the the destination organization to which you want to move the project.
- Booyah! The project migration to the new organization has been completed.
Conclusion
If you’ve tried moving projects between Google Cloud accounts without any luck in the past, it’s not as complicated as it may appear these days.
The migration process is fairly smooth as long as you can coordinate the process between the owners of both organizations and ensure that proper permissions and policies are set. With this step-by-step guide, you should now have a good understanding of how to migrate a project(s) from one Google Cloud organization to another.
We hope this guide will help you with your assignment! If you have any questions related to Google Cloud migration projects or any other custom software development needs, don’t hesitate to contact the click5 Team.